Planners and Schedulers are amazing people. They work with huge data sets, sometimes full of exceptions and gaps – and they remember a ton of it, too! But one of the biggest challenges they face in their careers and in their day to day success is the ability (or lack thereof) to view and manipulate that data easily, quickly, and effectively.
One seemingly minor annoyance can end up wasting Planners and Schedulers a lot of time. An extra few seconds here, a couple of minutes every day – by the end of the year, you might be looking at a couple weeks’ worth of time lost to the “limbo” of waiting for a page to load or to find a specific field.
It can be something as simple as not being able to view enough rows (such as work orders (WOs), records, purchase contracts, contract lines, etc.). Often, the default view is set to 25 rows. For many Planners and Schedulers, this is a laughably tiny number of rows. Most prefer to work with upwards of 100 WOs at the same time – about the number of WOs a small crew could complete in a week, give or take.
Seeing only 25 records and having to hit “next” to get to the next 25 and so on becomes a huge waste of time. If the WO you’re looking for is four or five pages deep, you’re going to be seriously annoyed.
Of course, one solution is to narrow down your data set. But that’s not always possible or desirable. Instead, I suggest this fix: configure IBM Maximo to display the number of rows that works for you.
Increasing the number of rows displayed in IBM Maximo CMMS
Here’s how to do it:
Open the application to be modified. In this example, I used “Purchase Contracts”.
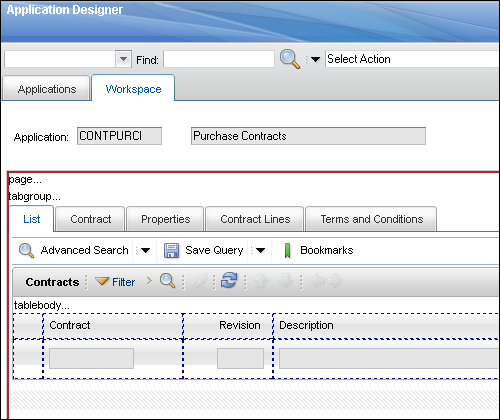
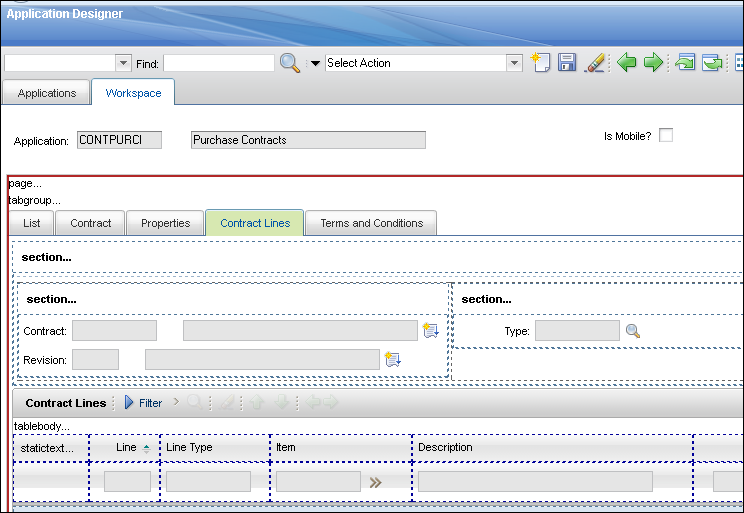
Click on the tab that has the table in which you want to increase the row count. In this case, I’m using “Contract Lines”.
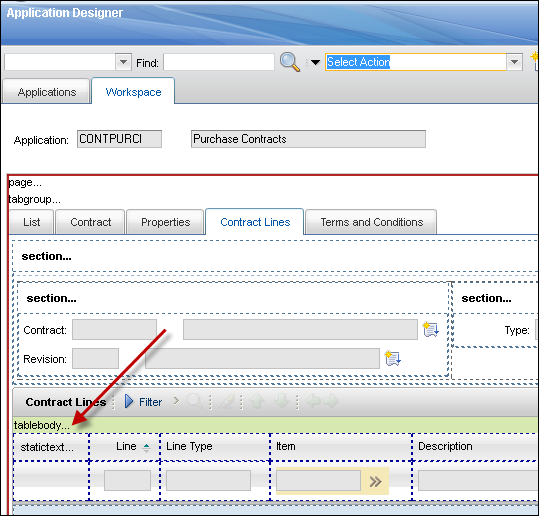
Next, select the “tablebody” section of the table where you want to increase the row count.
Right click and select “Properties”.
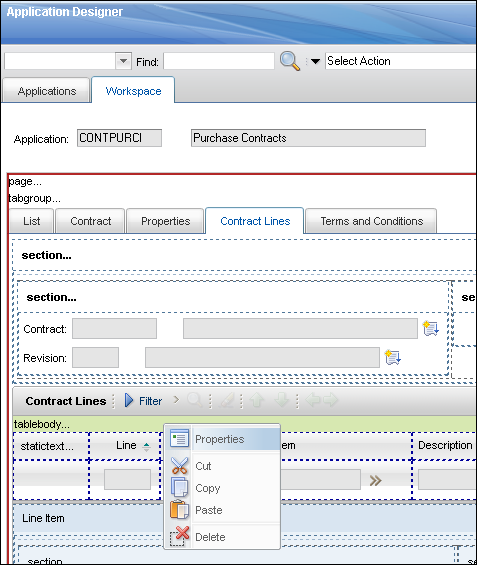
Then, all you have to do is update the “Display rows per page” value to whichever new value you desire. 100? No problem! 150? Go for it! Customize to your heart’s content.

After that, all you need to do is save the record and test the changes in the “front” of the application. And, if you change your mind and decide you want more – or fewer – rows to display in Maximo, just repeat the process and adjust accordingly. It’s that easy.
When you’re working in IBM Maximo CMMS, you want to be able to quickly see the things you need – not waste time digging for them while you’ve got a job to do. This tip should help you get more rows into one screen, and saving a few seconds here and there can add up to major time savings over the course of the year.
Last Updated: July 25, 2025