How many of you have run into the situation that you need to add more and more columns to a Maximo dialog box to enhance the experience for the users? But at the same time, you diminish the user experience because now, you have 12 columns that are all squished together in an index-card-sized dialog box. Please raise your hand if you’ve ever done that.
I’m guilty of doing this many (many) moons ago.
It got so bad, my users were complaining that they could not read the information in the dialog boxes well enough to make informed decisions. I had to figure out a way to enhance the user experience. AKA, remove the squishiness!
Modifying Dialog Boxes in IBM Maximo CMMS
So, cutting to the chase, this is how I modified a dialog box to be able to fit all of the additional columns that the users needed.
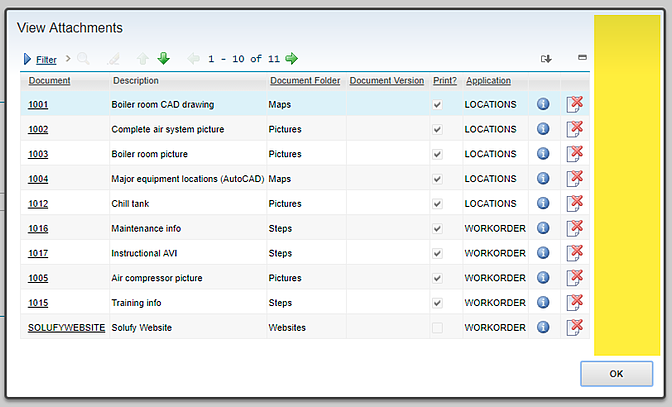
In this example, we will look at increasing the size of the View Attachments dialog box. We will only modify the width of the box. In this article, we won’t address adding more columns, taking them away, or anything else.
For this exercise, this is how my Attachment screen looks out of the box. As you can see, there’s not a lot of room to add more columns to this dialog box.

To modify the width of this particular dialog box, we need to update the LIBRARY.XML used by Maximo. As I’ve mentioned before, there’s more than one way to skin a cat. For this article, I’ll be using the front door tools provided by the IBM Maximo CMMS application.
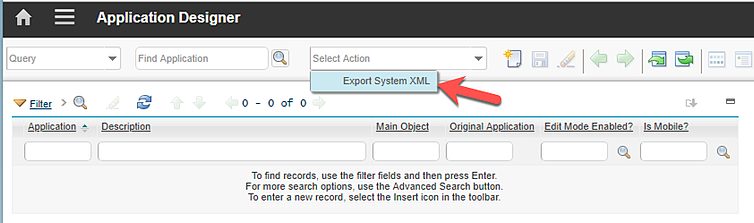
Step 1: Export the LIBRARY.XML information. To do this, you have to browse to the Application Designer app and from the Select Action menu, click on Export System XML.
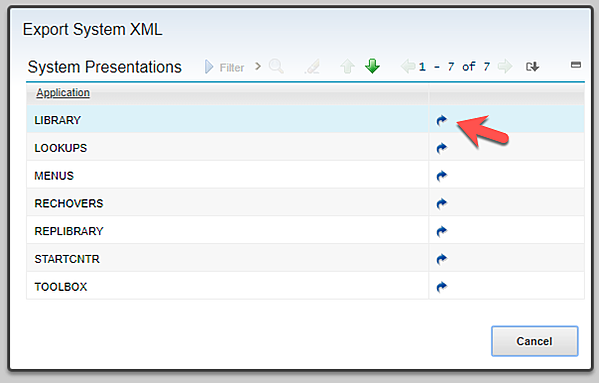
After clicking on the Export System XML, you will get a dialog that allows you to pick which system XMLs you want to export. Go ahead and click on the blue arrow by the LIBRARY.XML.
This will open the LIBRARY.XML in a new tab and it will look something like this:

If your Maximo configuration does not allow more than one session, you will see a message like this one:
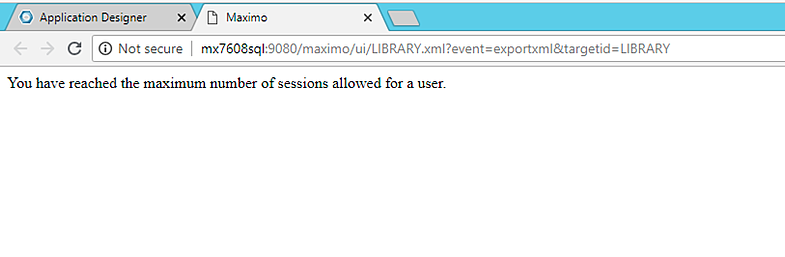
To work around this issue, you can reference my article, Increasing the Number of Sessions in Maximo: One Way You Can Do It.
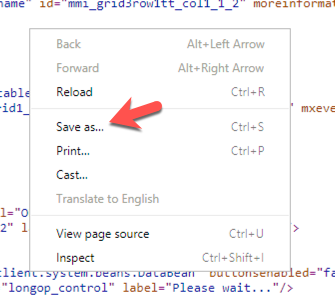
Once you have the LIBRARY.XML displayed on your screen, if you right-click on the browser session, it will give you an option to save the file. Go ahead and save it locally so that you can modify it.
Next, we will be searching in that file that we saved for the dialog box “definition” that we want to update. In our case, the Attachments dialog box. The line that you need to search for is this one:
<dialog id="view attachments" label="View Attachments" save mode="ONLOAD">
Once you’ve found the line, add the following: width=“pixels” . This will tell Maximo your desired width in pixels for this dialog box. In this case, I’m using 800 pixels. The updated line will look like this:
<dialog id="view attachments" label="View Attachments" save mode="ONLOAD" width="800">
Go ahead and save the file and import it to Maximo. To import the file in Maximo, click on the Import Application Definition button in the Application Designer app.
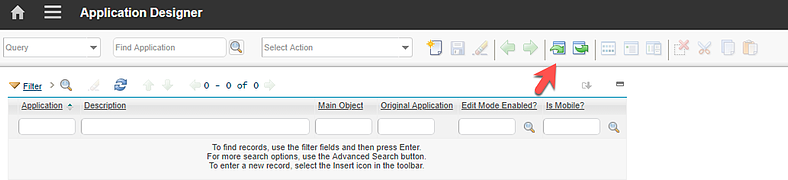
This will display a dialog box that will allow you to choose the file you wish to import.
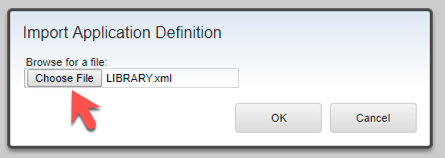
Choose the file. In our case, LIBRARY.XML and click OK.
You will have to log out of Maximo and log back in before you see the changes that you’ve just made.
Once you log back in, you can open the View Attachments dialog box on the Work Order application and you’ll see that you’ve got extra space, based on the configurations made above.
Now, you can add more columns, stretch the width of the existing ones, or do whatever you need to do to make it a more user-friendly experience. And when the users are happy, you’re happy. How many of you have run into the situation that you need to add more and more columns to a Maximo dialog box to enhance the experience for the users? But at the same time, you diminish the user experience because now, you have 12 columns that are all squished together in an index-card-sized dialog box. Please raise your hand if you’ve ever done that.
Last Updated: May 23, 2025