


What is Root Cause Analysis (RCA)?
Root cause analysis (RCA) is a proven method for identifying the underlying reasons for a problem or failure. While commonly associated with asset maintenance and management, RCA’s utility extends beyond individual equipment failures. Organizations are increasingly leveraging RCA to analyze complex events like shutdowns, turnarounds, and outages (STOs), helping uncover systemic issues and prevent recurring problems.
At its core, RCA focuses on why an event occurred rather than simply addressing its symptoms. For example, when an asset fails, identifying the true cause—such as insufficient preventive maintenance, poor procurement processes, or operator error—ensures the failure doesn’t recur. Similarly, RCA applied to STO events enables organizations to assess failures holistically, providing actionable insights to improve processes.
How Root Cause Analysis Improves STO Planning and Execution
Why STOs Often Struggle
Despite their critical role in maintaining operational efficiency, most STO events fail to meet their intended goals. According to Practical Shutdown and Turnaround Management for Engineers and Managers by IDC Technologies, over 90% of analyzed STOs failed to achieve business objectives, specific turnaround targets, or both.
Common issues include:
- Scope creep exceeding 10–50% of initial projections.
- Budget overruns.
- Missed deadlines.
- Incomplete work scopes.
These challenges highlight the need for better root cause identification and process optimization. Some scope growth is inevitable during an STO, but forward-looking techniques can help mitigate its impact. For example, adaptive planning, which infuses agility and mobility into STO planning and execution, provides teams with the flexibility to address unexpected challenges. Additionally, implementing proven tactics for controlling scope creep can give your team a better chance of success.
However, no amount of planning or scope management can uncover the root causes of past failures. For that, you need RCA techniques to determine why your last STO went sideways and how to prevent it from happening again.
Why Post-STO Root Cause Analysis Is Critical
Conducting RCA immediately after an STO is essential for long-term improvement, yet it is often overlooked. Teams are typically exhausted, with key personnel transitioning to other projects or taking PTO. Without buy-in from leadership and team members, the opportunity to learn and grow is lost. RCA ensures that the painful lessons of a failed or underperforming STO inform future events, turning setbacks into opportunities for success.
Using the Pareto Principle for Root Cause Analysis
What is the Pareto Principle?
The Pareto Principle, also known as the 80/20 rule, states that 80% of outcomes stem from 20% of causes. This principle offers a powerful lens for analyzing STO failures, as it helps teams identify and prioritize the critical few factors that cause the most disruption.
For example, while many things may have gone wrong during an STO, a sizable percentage of the issues may stem from a single root cause—such as a failure to manage scope creep. This single issue can cascade into larger problems, including workforce shortages, missed deadlines, and budget overruns.
By focusing on these high-impact root causes, STO teams can streamline corrective actions and achieve better outcomes. However, the Pareto Principle isn’t a rigid rule—it’s a guide to help frame your analysis. Not every scenario will align perfectly with the 80/20 ratio, but the insights gained from this perspective are invaluable for driving efficiency and improving processes.
Find the Most Common STO Failures with Pareto Charts
What is a Pareto Chart?
Pareto Charts are a practical tool for applying the 80/20 rule. These charts combine bar graphs (showing failure categories) with a cumulative line graph to visualize the impact of each category.
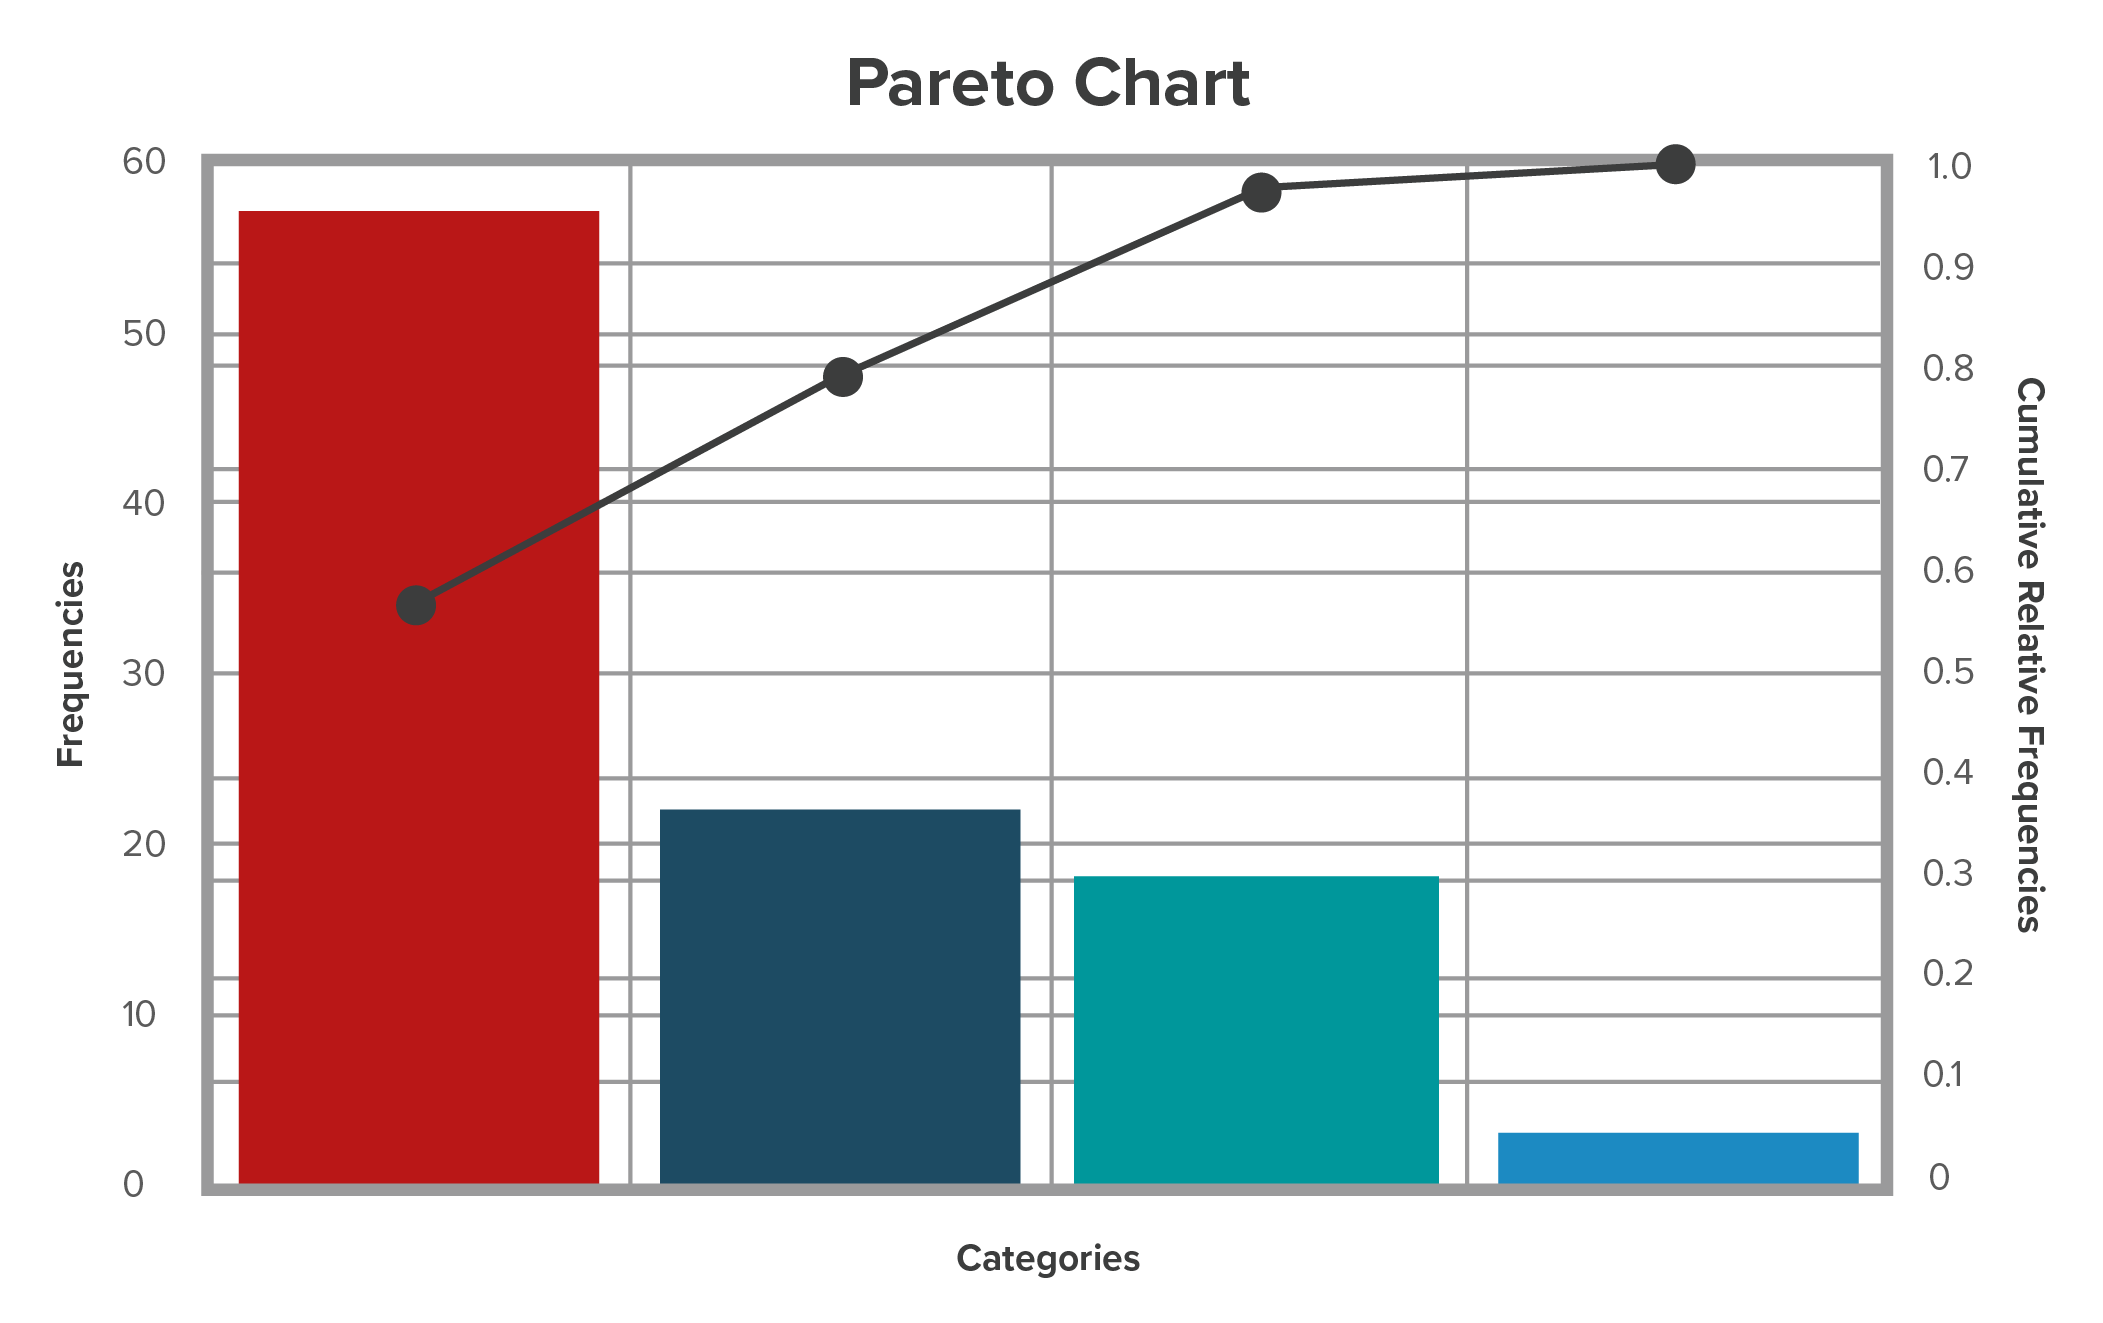
Steps to Create a Pareto Chart:
- Gather Data: Document all issues encountered during the STO.
- Categorize Failures: Group failures into categories (e.g., "Materials Unavailable," "Vendor Delays," etc.).
- Rank by Frequency: Arrange categories in descending order of frequency or impact.
- Visualize with a Line Graph: Add a cumulative percentage line to illustrate which categories contribute most to overall failures.
Using Pareto Charts, organizations can quickly identify areas requiring immediate attention and allocate resources effectively. These visualizations also help communicate findings to stakeholders, fostering alignment and collaboration.
Identify Root Causes with the 5 Whys Method for STO Failures
What are the 5 Whys?
The 5 Whys is a simple yet powerful RCA technique that involves repeatedly asking “why” until the root cause of a problem is identified. Developed by Sakichi Toyoda, founder of Toyota Industries, this method remains widely used for troubleshooting and continuous improvement.
Example:
Q1: Why did work order X exceed the timeline?
Technician didn’t have the necessary parts.
Q2: Why weren’t the parts available?
The vendor delivered late.
Q3: Why was the vendor late?
Procurement requested parts after the deadline.
The team underestimated lead times for specialized parts.
By the fifth "why," the root cause (inaccurate lead time estimation) becomes clear, allowing teams to implement countermeasures—such as updating procurement protocols—to prevent recurrence.
What Are Root Cause Countermeasures?
Root cause countermeasures are targeted actions designed to address the underlying issues uncovered through root cause analysis (RCA). Unlike temporary fixes that address symptoms, countermeasures focus on eliminating the root cause to prevent the problem from recurring.
For example, if delays in an STO are traced back to incomplete procurement schedules, a countermeasure might involve implementing stricter deadlines for order submissions or integrating automated tracking tools to ensure timely delivery. By tackling the issue at its source, organizations can reduce disruptions, increase efficiency, and improve overall performance.
Countermeasures are most effective when they are specific, actionable, and aligned with the organization’s broader goals. Implementing them requires collaboration, accountability, and consistent monitoring to ensure they achieve the desired outcomes.
Strengths and Weaknesses of the 5 Whys
The 5 Whys method is intuitive and easy to use, making it a popular choice for identifying root causes. Its simplicity allows teams to quickly trace a single chain of causality and identify actionable countermeasures.
However, the 5 Whys has limitations. It tends to follow a single linear path, which can overlook multiple contributing factors or complex interrelationships. For example, a delay in an STO might involve several intertwined causes, such as insufficient contractor availability and delayed material deliveries, which a purely linear analysis may miss.
To address these limitations, the 5 Whys is best used alongside other tools like Pareto Charts or Fishbone Diagrams. These methods provide a broader, more visual approach to identifying and prioritizing multiple root causes, ensuring a comprehensive analysis.
Discover STO Failures with Cause-and-Effect Analysis
What is a Fishbone Diagram?
A fishbone diagram, also known as an Ishikawa or cause-and-effect diagram, is a visual tool for identifying and organizing the potential causes of a problem. Named for its resemblance to a fish skeleton, the diagram places the problem or effect at the "head," with categories of potential causes branching off like "bones."
Originally developed by Professor Kaoru Ishikawa of the University of Tokyo, the fishbone diagram is less linear than the 5 Whys method. It allows teams to map out multiple contributing factors simultaneously, offering a broader and more nuanced view of root causes.
Typical categories include:
- Materials
- Workforce
- Processes
- Tools
By visually organizing these factors, fishbone diagrams help teams systematically investigate issues, identify patterns, and determine the root causes of failures. This approach is particularly valuable for STO planning and analysis, as it enables teams to consider complex, interconnected problems and implement targeted countermeasures.
Steps to Construct a Fishbone Diagram:
- Define the Problem: Write the main issue (e.g., "Budget Overruns") at the “head” of the diagram.
- Identify Categories: Branch out key categories of causes (e.g., "Planning," "Execution," "Resources").
- Brainstorm Causes: Populate each category with potential causes.
- Analyze Causes: Use techniques like the 5 Whys to drill down into each potential cause.

Proactive and Reactive Uses of Fishbone Diagrams
Fishbone diagrams are versatile tools for both planning and post-event analysis, making them invaluable for improving STO processes.
Proactive Planning:
In the planning phase, fishbone diagrams help teams identify potential risks, such as resource shortages or unclear timelines. By visualizing possible points of failure, teams can prioritize countermeasures and allocate resources effectively, reducing the likelihood of disruptions.
Reactive Analysis:
Post-STO, fishbone diagrams allow teams to analyze what went wrong, such as delays caused by contractor availability or misaligned workflows. This structured approach uncovers root causes and documents lessons learned, creating a foundation for future improvements.
By leveraging fishbone diagrams both proactively and reactively, STO teams can anticipate challenges, address failures, and continuously refine their processes for greater success.
Documenting Root Cause Analysis for STO Success
Regardless of the RCA technique employed, documentation is critical for leveraging insights across multiple STO cycles. Without a centralized record of failures, causes, and countermeasures, organizations risk repeating costly mistakes.
Best Practices for Documentation:
- Centralize Findings: Use tools like Prometheus STO Planner to maintain a single repository for RCA outcomes.
- Standardize Formats: Ensure consistency in how failures, analyses, and corrective actions are documented.
- Encourage Accessibility: Make RCA findings available to all relevant stakeholders, including future STO teams.
The costliest failures are those we fail to learn from. By documenting RCA findings, organizations can build institutional knowledge, foster a culture of continuous improvement, and drive better results in future STOs.
The Case for Root Cause Analysis in STOs
Root cause analysis is not just a tool for fixing what’s broken—it’s a framework for achieving operational excellence. By applying methods like Pareto Charts, the 5 Whys, and fishbone diagrams, organizations can uncover and address the root causes of STO failures, ensuring future events are more successful.
To explore how RCA can transform your STO processes, download our whitepaper: Centralizing Your Shutdown, Turnaround, or Outage: Creating Alignment Between Your STO Plan, Process, and Team or give us a call today.
Last Updated: April 28, 2025
